|
If you are wondering what it takes to service your PT Cruiser automatic transmission and if you can do it yourself, then I would have to say it’s very easy and ‘yes’ you can do it with just a few very common mechanics hand tools. The process is simple and straight forward, does not require any special tools and can easily be done in about an hour or less.
TOOLS AND SUPPLIES NEEDED
- 5 US QTS of Automatic Transmission Fluid of type ATF+4 (nothing else should be used)
- Transmission filter: Mopar #4864505AB, WIX #58934, PIONEER #745063
- 1 Tube of RTV Sealer, Permatex, JB, any brand, choose the stronger higher temp version if you have a choice
- 10mm 3/8” socket
- 6” extension
- 3/8” ratchet
- Gasket scraper (to remove old gasket/RTV)
- Floor jack
- Jack stand
- Transmission fluid funnel (for refilling transmission
- Oil drip pan to catch old oil when removing pan
HOW TO PERFORM THE SERVICE
STEP 1: Park the car on a solid level service, set the emergency brake and place the transmission in PARK
STEP 2: Using the floor jack or other suitable lifting device, raise the front drivers side of the car high enough to allow for easy access to the underside of the engine. If you are fortunate enough to have a car lift, raise the car to an acceptable level to access the underside of the engine/tansmission.
STEP 3: If using a floor jack or similar jack, place the jack stand in a secure spot and lower the car onto it so that it is supporting the weight of the vehicle. Leave the jack in place and with some weight being supported to act as a stand-by or backup device. Safety first! ...do not crawl under the car w/o a jackstand supporting the cars weight, Hydraulic jacks can leak down, scissor jacks can fail and you could be injured seriously, even killed.
STEP 4: Place the oil drip pan under the transmission.
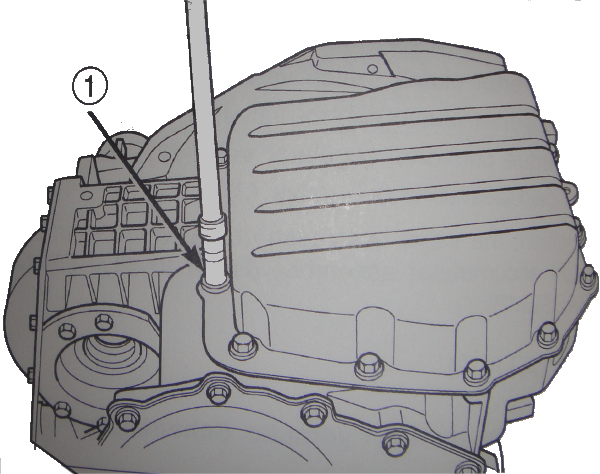
STEP 5: Using the 10mm socket, extension, and 3/8” ratchet, remove the transmission pan bolts.
 |
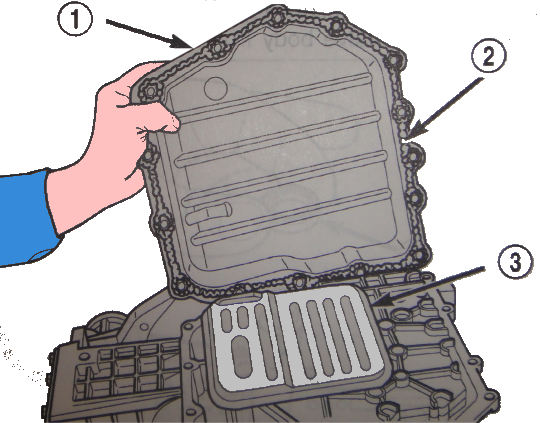
STEP 6: Once the bolts are removed, you may have to tap the corner a few times to break the seal of the old RTV gasket. Do this slowly so that the pan does not pop off completely and all the fluid escapes at the same time. You really want to just breach the seal and let the first few quarts of fluid drain out slowly at first then open the seal a bit more once you have control to get additional fluid to drain out. It is a good idea to leave two bolts a few turns loose on the opposite side of the pan that you break the seal on so that they support the pan if it wants to suddenly drop of entirely.
 |
STEP 7: Using shop towels or any suitable absorbent product, clean the inside of the transmission pan as well as the small round magnet.
STEP 8: If there is RTV sealer residue present, using your gasket scraper remove the old RTV gasket. It is important to get all the old RTV sealer off the pan. The pan is coated on the inside with a special black enamel, you should avoid using any tool (like a razor blade or wire wheel) to remove the old RTV gasket material. After the pan is cleaned of all the old RTV, clean the bottom of the transmission of all the RTV that might have remained on the transmission body.
STEP 9: Remove the old transmission filter, It is not bolted in place, it simple slips into place and a rubber O-ring holds it in place. A few gentle tugs and a bit of wiggling from corner to corner will release it. Be sure to also remove the old oil seal that might remain in the valve body hole. You do not want two of the seals to be in place when you install the new filter and the new o-ring.
STEP 10: Discard any gasket that might have been included with your filter kit. It will probably leak. The factory used and recommends an RTV sealer for this operation. Once the pan is clean of all old RTV and is clean and dry, apply a 1/8” thick bead all the way around the pan gasket surface. You want your bead to go on the inside of the bolt holes, not on the outside or the pan will leak profusely. There is no need to go all around the bolt holes, but you can for some added no leak insurance. You do not need a big fat bead either, a bead that is approximately 1/8” is enough.
STEP 11: Set the oil pan with its fresh RTV aside for about 5- 10 minutes to let the RTV begin to cure.
STEP 12: While the RTV is curing, install the new filter O-ring on the filter and place the filter up onto the valve body. A little pressure and wiggling is required to get the filter and the O-ring to seat. Take care to not use too much force installing the filter as to damage it. The fit will be a little loose when installed, the oil pan will do the rest of the job holding the filter in place, the oil pan and filter rest against each other when installation is completed.
STEP 13: Re-install the oil pan carefully, try not to disturb the RTV beat as you place the pan in place. Avoid having the need to slide the pan around very much to align the bolt holes. Place a few bolts in place just a turn or two to hold the pan in place while the remaining bolts are put into position. In a cross pan pattern, begin to snug the pan bolts down. Work your way around the pan a few times to get all the bolts snug and to evenly distribute the RTV. Once the bolts are snug, give them a final turn to get them tight, no need to be a gorilla and tighten them so tight as to strip the aluminum transmission bolt holes. The correct torque on the bolts is 19Nm.
STEP 14: Remove all tools and drip pans from under the car and lower the car to the ground for the fluid refil.
STEP 15: Refill the transmission with approximately 4.2 - 5 US Quarts of ATF+4 fluid. Do not overfill and do not use any other type fluid. Conventional or synthetic is just fine. In the three services that I have done, they all took between 4.2 and 5 QTS to get to the full mark on the dip stick and we chose the Valvoline Full Synthetic ATF +4 product.
STEP 16: If possible, wait 8 - 12 hours for the RTV to finish sealing and drying before you test drive the car. This step is not mandatory ...but then again it won’t hurt either.
STEP 17: Test drive the car, check for leaks after the service is complete. Do a final fill check on the dipstick to confirm the proper level once the fluid is hot and the car has been driven. Car parked on level surface.
|