|
Turbo Dodge Walbro 190/255
Fuel Pump Installation
So you want or need to install a new Walbro fuel pump in your 1984-1993 turbo Dodge?
There are a few things to consider first and before you order one, you might want to review the information provided below. The information presented below is intended to inform. Some of this information you might not have yet considered so at the very least, if you review the details below, you will at least be making an informed decision on which pump to buy, and where to buy it.
The installation instructions for the Walbro pump install for 89 and older cars is also found below, later cars are quite similar...but a little different. Click here to go straight to the installation instructions.
PUMPS, ACCESSORIES AND COUNTERFEITS
CHOOSE YOUR GENUINE WALBRO SOURCE CAREFULLY
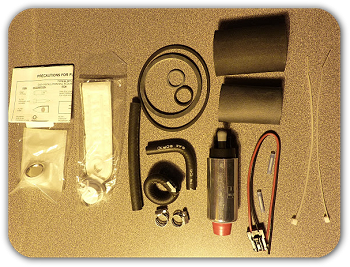
 It is not just the genuine Walbro pump most turbo Dodge enthusiast need, it's also the turbo Dodge specific installation accessory kit that our community supporting vendors such as turbosunleashed.com and fwdperformance.com also include in their package. The installation accessories package comes with everything you need to install your pump in your car on the factory hanger. This is a HUGE time saver. It is not just the genuine Walbro pump most turbo Dodge enthusiast need, it's also the turbo Dodge specific installation accessory kit that our community supporting vendors such as turbosunleashed.com and fwdperformance.com also include in their package. The installation accessories package comes with everything you need to install your pump in your car on the factory hanger. This is a HUGE time saver.
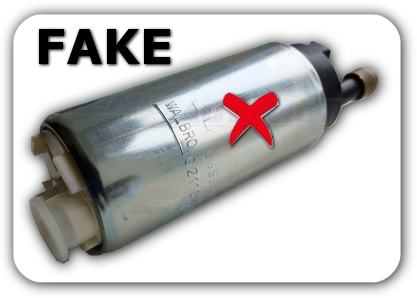
 It is important to note that not all Walbro pumps are created equal! We mean, there are plenty of fakes on the market, don’t be fooled. And they are really good fakes too, right down to the packaging, plastic caps on the fittings, fake warranty card, even the engraved Walbro logo on the metal case. A genuine Walbro has a nicely done logo engraved on the case, a copy, well not so much. They are hard to tell apart unless you have a known genuine one in one hand but we provide a very comprehensive guide to help you tell if what you have is genuine Walbro pump or not. You can see our “How to tell a fake Walbro guide” by clicking here. It is important to note that not all Walbro pumps are created equal! We mean, there are plenty of fakes on the market, don’t be fooled. And they are really good fakes too, right down to the packaging, plastic caps on the fittings, fake warranty card, even the engraved Walbro logo on the metal case. A genuine Walbro has a nicely done logo engraved on the case, a copy, well not so much. They are hard to tell apart unless you have a known genuine one in one hand but we provide a very comprehensive guide to help you tell if what you have is genuine Walbro pump or not. You can see our “How to tell a fake Walbro guide” by clicking here.
For the few $$ saved and the extra time invested in hunting one down, just picking up the keyboard or phone and ordering one from turrbosunleashed or fwdperformance is worth it and the peace of mind is hard to put a price on. You just cant go wrong choosing either fwdperformance.com or turbosunleashed.com as your Walbro fuel pump source and they include the needed turbo Dodge specific installation accessory kit.
INTERESTING TECHNICAL FACTS ON WALBRO FUEL PUMPS WHEN BEING USED IN TURBO DODGE AUTOMOBILES
FUEL SUPPLY
Also note that the Walbro 190 delivers at least 20% more fuel than the factory pump did and does it at approximately the same current rating as the factory pump. The Walbro 255 (GSS342) delivers a level above that and draws a bit more current. More current means more heat at the ASD relay. I don't know of anyone that has reported any problems with wiring or burnt out ASD relays, but its just information many do not consider.
There is a point where the OEM fuel lines become the choke in the system and must be replaced with larger supply and return lines so just adding the big pump, with any needed wiring upgrades to handle the added current does not mean it will be able to deliver if the lines are too small. Also consider that the fuel filter will become a choke and may require an upgrade and the FPR and the fuel pressure damper (FPD)will be working a lot harder to maintain a suitable and constant stable fuel pressure.
CURRENT AND VOLTAGE REQUIREMENTS
A stock genuine Chrysler fuel pump requires about 7 amps at 12v, a Walbro 190 requires about 8amps at 12 volts and the Walbro 255 requires about 10amps at 12 volts. Other brands have similar amp requirements based on their design and delivery capabilities.
Also give some thought to the OEM alternator being undersized for a fuel injection system to begin with and a larger pump may force you to also upgrade the alternator/charging system. This was the case when I added a 255 to my 87 GLHS with the OEM alternator still on it. I spent several weeks tryiing to determine why it didn't run right under high boost, it would surge noticeably. When I went to the 90amp nippondenso alternator w/the 87 Lancer adjusting strap and alternator bracket (and the 90 amp negative harness portion from a p-body Shadow, that problem went away. The old and tired L body alternator, could not keep up with the needed current demands when making good power. The alternator upgrade was the only change I made to fix that problem. I noticed that the lights would dim a bit when the A/C compressor turned on and a friend, that was racing me said that when I was behind him he could see my headlights dim when I was catching up and under full boost.
INSTALLATION AND APPLICATION SUMMARY
The Walbro 190 with the turbo Dodge installation accessory pack it is an easy direct swap in for the factory pump and will be just fine up to and above the 200HP mark. There is no need for the Walbro 255, but it is an option that will easily take you to 300hp+...but it is a little larger than the 190 and requires just a little extra effort to get it mounted and installed. Either one will serve you just fine. Bigger is NOT better as far as fuel pumps go. The larger the pump, the more current it will draw, the larger the pump the more effort required to complete installation. Also note that the fuel pressure regulator is going to keep fuel pressure where it belongs anyway. You are more likely to run out of fuel line delivery capability before you over-run a 255...or maybe even a 190. If 200hp is your probable goal, and up to 250 maybe...then the 190 is just about right, requires less current to operate, and is just a little bit easier to get installed.
INSTALLING THE WALBRO FUEL PUMP
TURBO DODGE 89 AND EARLIER
STEP 1
The first step in preparing to replace the fuel pump is to get access to the fuel pump sealing ring. Typically you do not have to drop the tank completely, on some models with passenger side access rather than rear of tank access you dont even have to jack up the car. But for the cars with access at the rear of the tank, you might find it easier to loosen the tank straps if necessary and allow the tank to hang down just a bit so that access to the pump sealing ring as well as removal/installation is easier.
The first step is to remove the electrical connector(just pulls right off) and the fuel hoses where they attach to the pump. It’s not a good idea to try to pull hard on the fuel hoses after loosening the clamps to get the hoses off the pump. It is better to cut them off at the nipple with a sharp tool , don't pull hard on the nipples or you could bend, crack, or completely break off a nipple and then require the replacement of the fuel pump hanger assembly. You should also consider replacing the fuel hoses at that time as well, if they are 20+ years old like the fuel pump, it’s time. Use ONLY fuel injection fuel hose!
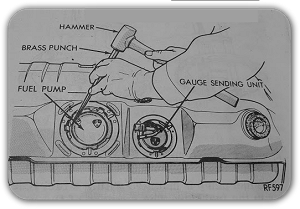
To remove the metal sealing ring after disconnecting the hoses and electrical pigtail, use a drift or other suitable tool to tap the metal seal ring counter-clockwise to remove it. It is indexed and will simply drop away when it has released.
 |
Once the metal sealing rig has been removed, the pump can be removed from the tank. Note that you may have to rotate the pump a bit one way then the other to get the fuel sock and/or the fuel sender float arm to clear the fuel well inside the tank. The pump and sock sit down inside a ‘well’ and when you remove the pump, you do have to lift the pump body up and over the edge of the well. Be patient, do not try to force the pump out, gentle easy turns are all that should be needed. The pump pictured below should closely resemble the one you removed from the tank. some cars have an integrated fuel sender float (not pictured) but the pumps and installation process is the same for either version. If you have the integral fuel sender float, some extra care should be taken to not bend or damage it.
STEP 2
Now remove the pump from the hanger. Cut the wires off close to the pump, at the electrical connectors. You want to leave plenty of wire for your splice in of the new pumps connector.
Unscrew the 2 screws holding the metal support rod to the plastic pump holder. The only thing connecting the 2 halves of the pump assembly now should be the rubber fuel line.
Remove the clamps on the fuel line and remove it. Also to note, the black round part inline with the fuel hose in the picture above is the pulse dampener. It is somewhat optional when reassembling. However, it does help to maintain a constant and even fuel pressure in the system. If you eliminate it, it is likely that you will see a fluctuating fuel pressure at the fuel rail especially at idle.
Now you can tear down the pump assembly removing all wear items and the old pump. Here is the pump broken down. The only parts you will re-use from this picture are the housing (2nd from left) and the isolator (black cylindrical rubber piece).
STEP 3
Now grab the new pump and install the new spacer and o-ring at the inlet. This is what seals it to the pickup.
STEP 4
Now install the new filter adapter in the housing. I would wait on the filter for now; I installed it a little early in this picture and had to remove it to see if the pump was seated correctly.
Then slide the black isolator back into the housing, and the new pump into the isolator ensuring the o-ring seats/seals against the filter adapter. If it doesn't, it won't transfer the suction through the strainer filter.
NOTE: If you are installing the Walbro 190 fuel pump, it will fit pretty easily into the existing black isolator. If you bought a 255 the fit with the factory isolator is too tight and could require trimming or just simply using the foam sleeve that comes with many of the accessory kits.
Replace the fuel line that goes between the pump and tank outlet and clamp in place. The pump kit usually comes with a replacement line, but if it doesn't MAKE SURE IT IS RATED FOR SUBMERGED USE! SAE-30R10 is the fuel hose rated for submerged use.
Also, your installation kit may come with worm gear clamps (pictured). I plan to swap them for the t-bolt style fuel clamps since I have heard of people having fuel system problems caused by the clamps cutting into the hose when tightened. Cheap insurance while I'm in there, I figure.
STEP 5
Now is a good time to do the wiring. Strip about 1/4" off the ends of each wire on the pump support and on the pigtail that came with the new pump. Splice the ends together noting polarity. (FYI, if your pump has 2 black wires coming from the support side, the positive one is the one with the larger connectors on each end. If polarity is reversed, your pump will run in reverse so make sure you are 100% sure on what is positive and negative.
STEP 6
The whole assembly should look like this when complete. Now all that is left is to plug in the pump's electrical connector, install the filter strainer to the pump inlet (if not done already) and install it back into the tank. USE A NEW RUBBER RING WHEN INSTALLING IT INTO THE TANK!
Buy a new external fuel filter and install it at the same time. Buy new 30R9 fuel injection (no regular cheap fuel hose) 5/16 and 1/4 to replace the lines to the tank, to the fuel filter,and to the fuel rail if they are old. 2 ft of each should be plenty.
|